第 4 章 Operation on vector and list
4.1 選取元素
4.1.1 選「一個元素」
4.1.1.1 用位置選[[.]]
- 用位置選:
object_name[[i]]
4.1.1.2 用名字選$.
# 有多少名字可選:
names(listExample)listExample$student
listExample$`學期` # 特殊命名依然要用反頓點呼叫其實也可以用[["名字"]]來選,只是名字要以字串「值」的方式來寫,也就是要用引號一對"…", 不用反頓點一對`…`。
listExample[["student"]]
listExample$student

listExample[["學期"]] # 小心不是反頓點喔。
listExample$`學期`
4.1.2 選「多個元素」
4.1.2.1 用位置選[c(...)]
vectorExample
vectorExample[c(1,3)]
# 顯示到第一層
str(listExample, max.level=1)
listExample[c(1,2)]4.1.2.2 用名字選[c("name1","name2",...)]
# 顯示到第一層
str(listExample, max.level=1)

listExample[c("學期")]
listExample[c("student","學期")]
4.1.2.3 用「要/不要」邏輯向量選[c(T,T,F,...)]
vectorExample
vectorExample[c(T,T,F)] # 要,要,不要str(listExample[c(F,T)]) # 不要,要
str(listExample[c(T,T)]) # 要,要str(listExample)listExample: length=2, list class
|
|--student: length=1, character class
|
|--學期: length=3, list class以下兩個都是表面都是選取“學期”:
get1 <- listExample[["學期"]]
get2 <- listExample["學期"][[]]: 拿出某個物件值。listExample[["學期"]]將listExample裡的“學期”物件值拿出來。
get1 # 學期拿出來,有3個元素的list
str(get1)[]: 留下某個物件值。listExample["學期"]「只留下」listExample裡的“學期”物件值。
get2 # listExample 只留下 學期元素,是個只有一個元素的list
str(get2)
4.1.3 連鎖選取
numVector <- c(2,3,6,-1,4,2,6)
select1 <- numVector[c(1,4)]; select1
select2 <- select1[[1]]; select2

# 相當於
numVector[c(1,4)][[1]]
select1 <- numVector[c(T,T,F,T,F,F,T)]; select1
select2 <- select1[c(1,4)]; select2
# 相當於
numVector[c(T,T,F,T,F,F,T)][c(1,4)]majors <- c("經濟學系","經濟學系","社會學系","社工系","經濟學系")
names <- c("小英", "小美", "大雄","阿華", "阿尼")
gender <- c("F","F","M","F","M")- 創造出只要“經濟學系”學生的邏輯向量,econOnly。
- 選出econOnly的names與gender。
- 在econOnly的gender下創造出只要“F”的邏輯向量, econFemaleOnly。
- 選出names中為“經濟學系”且“F”的姓名。
在前面討論使用$及[ ]取一個元素時我們創造了get1與get2兩個物件,請分別由get1, get2取出108-1學期個體經濟學教師姓名。
list應用
今明兩日台北市、新北市氣溫:
today <- list(
  list("台北市",c(highest_temp = 25),c(lowest_temp = 18)),
  list("新北市",c(highest_temp = 24),c(lowest_temp = 15)))
tomorrow <- list(
  list("台北市",c(highest_temp = 25),c(lowest_temp = 18)),
  list("新北市",c(highest_temp = 24),c(lowest_temp = 15)))

weather <- list(today,tomorrow)

print(weather)
選出新北市今明最高溫
weather[[1]][[2]][[2]] # 今天/新北市/highest_temp
weather[[2]][[2]][[2]] # 明天/新北市/highest_temp
以下選法行得通嗎?
weather[[1]][[2]]$highest_temp # 今天/新北市/highest_temp
weather[[2]][[2]]$highest_temp # 明天/新北市/highest_temp
如果不行,請把weather修改成可以那樣選。

AA = c(Mary=176, John=188, Jenny= 165, Kate=170)
LL = list(
  Mary=list(176,"Taipei"),
  John=list(188,"New Taipei"),
  Jenny=list(165,"Taichung"),
  Kate=list(170,"Hualien")
)
AA[[1]]
AA[1]LL[[1]]
LL[1]LL$Mary
AA[c(1,4)]
LL[c(1,4)]
AA[c("Mary","Kate")]
LL[c("Mary","Kate")]AA[c(T, F, F, T)]
LL[c(T, F, F, T)]4.2 新增/替換/刪除元素
4.2.1 新增
- 步驟一: 取出不存在
a <- c(2, 5, 7)
a[[4]]- 步驟二:賦予不存在存在值
a[[4]] <- 8
print(a)
範例:Foodpanda order
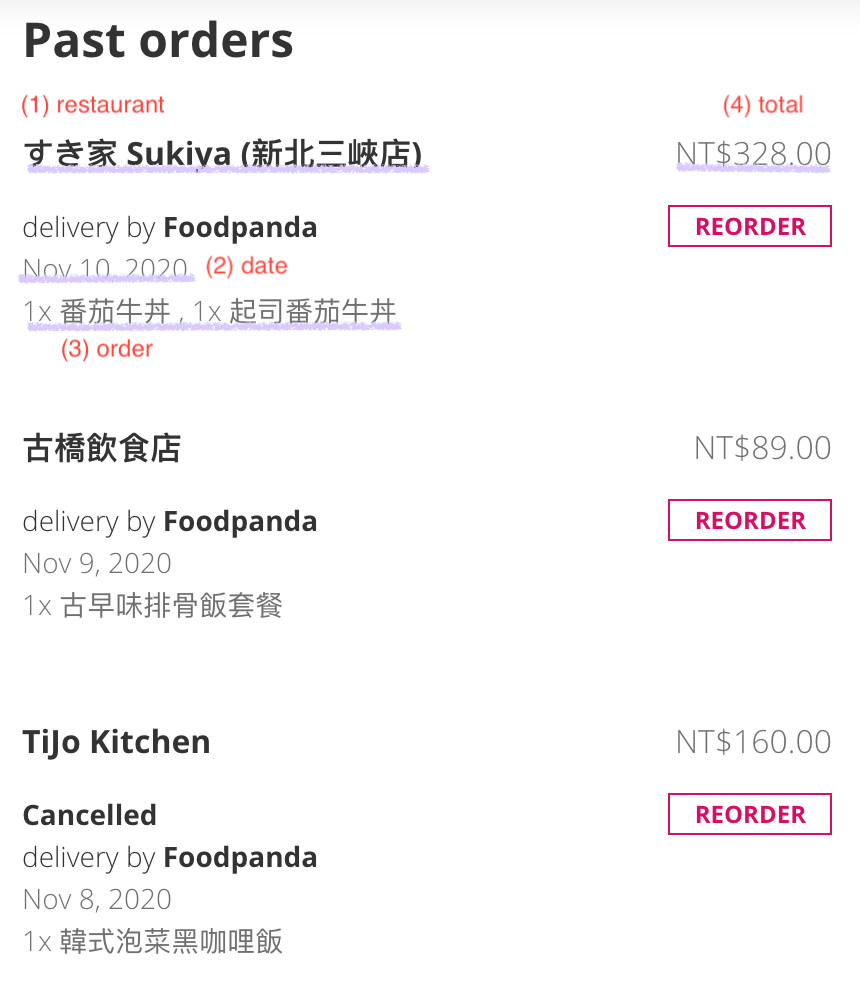
一筆資料有4個特徵:
restaurant = "すき家 Sukiya (新北三峽店)"
date = lubridate::mdy("Nov 10, 2020")
order = list(
  list(
    item="蕃茄牛丼",
    quantity=1
  ) # 這裡少了一筆 "起司蕃茄牛丼"
)
total = 328
包成一筆資料,因為內容非atomic type,只能用list:
oneOrder <- list(
  "restaurant"=restaurant,
  "date"=date,
  "order"=order,
  "total"=total
)
在oneOrder加入“起司蕃茄牛丼”:
步驟一: 取出不存在
假設它存在oneOrder, 會是在order元素下的第二個元素值。想一想會怎麼取出它:
oneOrder$order[[2]]步驟二:賦予不存在存在值
將新增的值用
->指向步驟一所取出(目前不存在)的元素值:
oneOrder$order[[2]] <- list(
    item="起司蕃茄牛丼",
    quantity=1
  )
有時要記住order底下元素架構不容易,可以先以已存在元素值當模版去修改:
template <- oneOrder$order[[1]]

template$item <- "起司蕃茄牛丼"
template$quantity <- 1

oneOrder$order[[2]] <- template
4.2.2 多筆新增
a <- c(2, 5, 7)
a[c(4,5)]a[c(4,5)] <- c(8,12)
print(a)在order裡增加1份’牛丼飯’,1份’豬排飯’
currentNumberOfOrder <- length(oneOrder$order)
# new order sequence number
newOrderSeq <- 1:2 + currentNumberOfOrder
oneOrder$order[newOrderSeq]- 使用
[]留意要保留母層結構。我們在oneOrder$order底下新增,所以母層是oneOrder$order, 子元素們指得是oneOrder$order[[1]],oneOrder$order[[2]], ..., etc.
class(oneOrder$order)- 母層是個list, 所以要新增時,
<-右邊的值們要用list()包起來:
oneOrder$order[
  newOrderSeq
] <- list(
  item1_value,
  item2_value
)oneOrder$order[
newOrderSeq
] <-
list(
list(
item="牛丼飯",
quantity=1
),
list(
item="豬排飯",
quantity=1
)
)
View(oneOrder)使用模版手法:
# 取出目前已有的子元素一個當模版
secondItem <- oneItem <- oneOrder$order[[1]]

oneItem$item <- "牛丼飯"
oneItem$quantity <- 1
secondItem$item <- "豬排飯"
secondItem$quantity <- 1

oneOrder$order[newOrders] <- list(
  oneItem, secondItem
)一次創造多個相同值可用<-不斷串連。
4.2.3 替換
- 步驟一: 取出錯誤值
LL0 <- LL <- list(
  "Mary was born on",
  ymd("1995-7-1"),
  "John was born on",
  ymd("1997-10-27")
  )
LL[[2]]- 步驟二:賦予正確值
LL[[2]] <- ymd("1995-7-8")
print(LL)
番茄牛丼改成2份
步驟一: 取出錯誤值
oneOrder$order[[1]]$quantity步驟二:賦予正確值
oneOrder$order[[1]]$quantity <- 24.2.4 多筆替換修改
LL <- LL0
LL[c(2,4)]
LL[c(2,4)] <-
  list(
    ymd("1995-7-8"),
    ymd("1997-10-17")
  )
print(LL[c(2,4)])
將三份訂單計在allMyOrders
List of many
 $ : list
 $ : list
 $ : list
 :
目前的allMyOrders
allMyOrders0 <- allMyOrders <-  # allMyOrder0等一下還原用
  list(
    oneOrder
  )
記錄多筆資料:
第二,三筆資料
anotherOrder <-
  list(
    restaurant="古橋飲食店",
    date=lubridate::mdy("Nov 9, 2020"),
    order=list(
      list(
        item="古早味排骨飯",
        quantity=1
      )
    ),
    total=89
  )
thirdOrder <-
  list(
    restaurant="Tijo Kitchen",
    date=lubridate::mdy("Nov 8, 2020"),
    order=list(
      list(
        item="韓式泡菜黑咖哩飯",
        quantity=1
      )
    )
  )
一一新增
allMyOrders[[2]] <- anotherOrder
allMyOrders[[3]] <- thirdOrder

str(allMyOrders)善用[.]取多個元素值可以做一次新增多筆資料:
allMyOrders <- allMyOrders0
allMyOrders[c(2,3)] <- list(
  anotherOrder,
  thirdOrder
)- 母層的結構記得保留。
thirdOrder少了total=160,同學把它加回allMyOrders。
4.2.5 刪除
主要方式:
- 取出要的再回存自己(沒有取出的,即是刪去)
a <- c("L", "K", "Z")
a <- a[c(1,3)]
print(a)使用[ ]取法還有一種:
a <- c("L", "K", "Z")
a[-c(1,3)] # 不選1,3
a <- a[-c(1,3)] # 刪去1, 3-只能用在numeric vector的取法。
List的額外刪除方法:
- List多了使用NULL取代值來刪除,
<-NULL(NULL是虛無,空的意思。)
LL <- list('a', T, 183)
LL[c(1,3)] <- NULL
print(LL)
In R, any expression like object <- value will permanently change the content of object with the value of value.
Permanently change element names:
a0 <- a <- c(John=178, Mary=170, Hanson=180)
names(a)

names(a) <- c("John", "Kate", "Hason")
names(a)

a <- a0
names(a)[[2]] <- "May"
names(a)
Permanently delete
a <- a[c(1,3)] # permanently change a

LL <- list("A", T, 17)
LL[[2]] <- NULL # permanently null the second element4.3 On numeric class
加、減、乘、除: +, -, *, /
a <- c(2, 3, 5)
b <- c(4,-1, 3)a+b
a-b
a*b
a/b餘數:%%
次方:** 或 ^
a %% b
# 相當於
c(2%%4, 3%%(-1), 5%%3)

a ** b
奇、偶數判斷
sequenceNums <- c(11, 6, 8, 11, 12, 11, 3, 7, 10, 8)
print(sequenceNums)

sequenceNums %% 2 # 餘數為1則是奇數,0則是偶數在多數時候R向量間的運算都是elementwise(個別元素)的運算:
- 所有向量一一取出各自對應相同位置的元素值進行運算。
# a+b 即等於
c(2+4, 3+(-1), 5+3)
# a**b 即等於
c(2**4, 3**(-1), 5**3)
當向量間不等長度時,R則對短的向量進行Recycle的動作(即Python的Broadcast):
- 將其中較短的向量反複堆疊到可以長得跟最長的向量一樣長度。
5*c(1,3,4)+7
# 其實是
c(5)*c(1,3,4)+c(7)

## 對向量5,向量7進行recycle:
c(5,5,5)*c(1,3,4)+c(7,7,7)
## Recycle等長後才進行elementwise operation:
c(5*1+7, 5*3+7, 5*4+7)當運算的兩物件內容長度不同時,則將其中較短的一個反複堆疊到可以長得跟另一個一樣高時才來運算,稱為recycling。
# 狀況一: 堆疊一定倍數剛好一樣長
c(2,3)/c(-2,-13,10,22)
c(2,3,2,3)/c(-2,-13,10,22)
# 狀況二: 倍數堆疊一定會超過,只好截斷
c(2,3)/c(-2,-13,10)
c(2,3,2)/c(-2,-13,10)Recycling不只用在數值class, 只要向量間的處理要等長度才合理時,recycling通常也會用在其他的class。
paste0(
  c("我叫"), c("小明","小美")
)
也等於是
paste0(
  c("我叫","我叫"), c("小明","小美")
)paste0(
c("他叫","我叫"), c("小明","小美","大雄")
)會出現什麼?
threeFiles <- paste0("file",1:3, ".csv")
file.create(c("file1.csv","file2.csv","file3.csv"))
4.4 Data Frame
後面小節使用的範例:
example <- list(
  name=c("小明","小花","小新","美美"),
  height=c(175,166,170,160),
  weight=c(77,NA,60,43),
  birthday=lubridate::ymd(c("1998-03-11","1999-12-22","1995-08-22","2001-10-10")),
  hobby=c("美食 旅遊","旅遊 時尚","3C 美食","音樂 旅遊"),
  residence=c("Taipei","New Taipei","Taichung","Kaohsiung"),
  allowance=factor(c("0-1000","1001-2000","2000+","1001-2000")),
  bloodType=c("A","B","B","O")
)
4.4.1 transpose of a list
上面的資料(List of 8)還有一種常見的記錄結構,就是以每一筆資料的特徵形成一個list, 四筆資料就有4個list,以list of 4來記錄所有四筆資料:
tr_example <- purrr::transpose(example)
str(tr_example)
4.4.2 The birth of data frame
example的資料結構在R常常賦予它新的class,data frame,以延伸比list更多的運算工具。賦予data frame class可透過as.data.frame()來達成:
df_example <- as.data.frame(example)方形資料:
column names: 元素名稱,即feature,或稱為variables
row index: 代表某一筆資料
只有list裡每個元素值都是:
等長度
atomic vector
才能正確轉成合理的data frame表示形式:
example2 <-
  list(
    name=c("John", "Mary"),
    height=list(178, 168), # not atomic vector
    weight=c(88, 56, 70) # not the same length as other elements
  )
as.data.frame(example2)
4.4.3 Extra tool [.row, .column]
[.]可以續繼使用外,還延伸了[.row, .column]用法
.row及.column均與[.]中的.一樣,可以使用:
- 名稱(character)
- 位置(numeric)
- 要不要向量(logical)
# 使用list的工具
df_example$name[c(1,4)]

# 使用data frame的延伸工具`[.row, .column]`
df_example[c(1,4), "name"]df_example[c(1,4), c("name","residence")]
# 只使用list工具
list(
name=df_example$name[c(1,4)],
residence=df_example$residence[c(1,4)]
)
# 要小心以下用法是error
df_example[c("name","residence")][c(1,4)]4.5 Relational Operators
這節在介紹產生「要/不要」向量的常見手法。
4.5.1 比較
>,<,<=,>=: 分別為大於、小於、小於等於、大於等於
數字比較
時間比較
可排序類別資料比較
數字比較
example裡誰的身高大於等於170
example$name[c(T, F, T, F)]str(example[c("name","height")])
pick_above170 <- example$height >= 170
example$height
c(175, 166, 170, 160) >= 170
example$name[pick_above170]時間比較:
example裡誰1998年(含)以後出生
example$birthday
class(example$birthday)
typeof(example$birthday)print(example[c("name","birthday")])
pick_after98 <- example$birthday >= lubridate::ymd("1998-01-01")
example$name[pick_after98]可排序類別資料比較:
example裡誰零用錢大於1000:
print(example[c("name","allowance")])

pick_allowanceOver1000 <- example$allowance >= "1001-2000"
example$name[pick_allowanceOver1000]
factor資料可進一步分成可排序,與不可排序的,如:
* 可排序: 以年齡層區分的類別,以所得級距區分的類別等。
* 不排序: 性別,學系等。
factor的設定內定為不可排序資料,如要改成可排序類別資料得特別設定。以先前已處理好的example$allowance 為例:
example$allowance <-
ordered(example$allowance)或在設定為factor時即把levels排好,並ordered=T:
example$allowance <-
  factor(
    example$allowance,
    levels=c("0-1000", "1001-2000", "2000+"),
    ordered = T # 設定為可排序factor
  )
pick_allowanceOver1000 <- example$allowance >= "1001-2000"
example$name[pick_allowanceOver1000]4.5.2 相等,屬於
==: 等於
!=: 不等於
==與!=可使用於任何class的atomic vector, 它是在比較兩邊向量elementwise speaking下,元素值是否相同。
example裡誰血型B型
print(example[c("name","bloodType")])

pick_bloodB <- example$bloodType == "B"
example$name[pick_bloodB]
sequenceNums <- c(11, 6, 8, 11, 12, 11, 3, 7, 10, 8)
pick_evens <- (sequenceNums %% 2) == 0
sequenceNums[pick_evens]創造可留下偶數的「要/不要」向量pick_evens。
還有一個常用的關聯運算:
%in%: 屬於
- 左邊元素「一一」檢視是不是屬於右邊元素集合。
x <- c(1,5,8)
y <- c(5,8)

# x裡的元素值是不是屬於y集合
x %in% y
example裡誰來自大台北
print(example[c("name","residence")])

set_TaipeiMetro <- c("Taipei","New Taipei")
pick_fromTaipeiMetro <- example$residence %in% set_TaipeiMetro
example$name[pick_fromTaipeiMetro]
When operations involved with a certain object, you can use with(the object, {...}) to conduct your operations. Within {...}, any objects called, but not defined, will be consider part of the elements of the certain object:
with(example,
     {
       set_TaipeiMetro <- c("Taipei","New Taipei")
       pick_fromTaipeiMetro <- residence %in% set_TaipeiMetro # residence not defined
       name[pick_fromTaipeiMetro] # name not defined
     }) -> whoAreFromTaipeiMetro
whoAreFromTaipeiMetro
4.5.3 Negation(否定用法)
在「要/不要」向量前加上!會成為否定句的「要/不要」向量,元素裡的TRUE會轉成FALSE, FALSE則轉成TRUE。
pick_not_fromTaipeiMetro <- ! pick_fromTaipeiMetro
# 或
pick_not_fromTaipeiMetro <- !(example$residence %in% set_TaipeiMetro) # (..) 裡面會先運算完才做外面!的處理print(example[c("name","residence")])
example$name[pick_fromTaipeiMetro]
example$name[pick_not_fromTaipeiMetro]4.5.4 資料狀態
is.na: 有缺失
is.{class/type name}: is.integer, is.character, is.factor … etc
有時資料有缺失,在R裡會記成NA(即not available)如下例:
x2 <- c(1,NA,10)
y2 <- c(-1,NA,20)

x3 <- c(NA,"小花")
y3 <- c(NA,"小華")前述的關係判斷遇到NA時,結果都會是NA——即無法判斷。要知道向量內各元素值是否NA,可使用is.na():
x2
is.na(x2)缺失資料的判斷一定要用is.na不能用==NA來判斷:
c(22,NA,18) -> a
a==NA
is.na(a)
example裡誰沒有體重資料
print(example[c("name","weight")])

pick_na <- is.na(example$weight)
example$name[pick_na]
R還有一種特別的缺失資料NaN (即not a number),出現在沒有定義的數學運算上,如:
0/04.5.5 字元偵測
- stringr::str_detect()
example裡誰喜歡美食
print(example[c("name","hobby")])

pick_loveFood <- stringr::str_detect(example$hobby,"美食")
example$name[pick_loveFood]
常有同學會有以下錯誤寫法:
pick_loveFood <- example$hobby == "美食"
pick_loveFood
新增一個假設的hobby2:
example[["hobby2"]] <- c("美食", "時尚", "美食", "旅遊")

print(example[c("name", "hobby2")])
pick_loveFood2 <- example$hobby2 == "美食"
example$name[pick_loveFood2]==字串內容一模一樣。str_detect字串內容有關鍵字。
4.5.5.1 閱讀函數說明
?str_detect- Title, Description, Usage, Arguments, Value, Examples
Title
Detect the presence or absence of a pattern in a string.
Description
Vectorised over string and pattern. Equivalent to grepl(pattern, x). See str_which() for an equivalent to grep(pattern, x).
Usage
str_detect(string, pattern, negate = FALSE)Arguments
string:
input character vector. Either a character vector, or something coercible to one.
pattern:
Pattern to look for.
The default interpretation is a regular expression, as described in stringi::stringi-search-regex. Control options with regex().
Match a fixed string (i.e. by comparing only bytes), using fixed(). This is fast, but approximate. Generally, for matching human text, you’ll want coll() which respects character matching rules for the specified locale.
Match character, word, line and sentence boundaries with boundary(). An empty pattern, "“, is equivalent to boundary(”character").
negate:
If TRUE, return non-matching elements.
Value
A logical vector.
Examples
fruit <- c("apple", "banana", "pear", "pinapple")
str_detect(fruit, "a")
str_detect(fruit, "^a")
str_detect(fruit, "a$")
str_detect(fruit, "b")
str_detect(fruit, "[aeiou]")

# Also vectorised over pattern
str_detect("aecfg", letters)

# Returns TRUE if the pattern do NOT match
str_detect(fruit, "^p", negate = TRUE)CDC_chatbox <- readr::read_csv("http://od.cdc.gov.tw/pr/CDC_chatbox.csv")4.6 On logical class
邏輯向量間(即「要/不要」向量)的操作主要是以下幾個:
&: AND|: OR
str(example)
pick_above170 <- example$height >= 170
pick_bloodB <- example$bloodType == "B"
pick_loveFood <-
  stringr::str_detect(example$hobby,"美食")
pick_na <- is.na(example$weight)
pick_after98 <-
  example$birthday >= lubridate::ymd("1998-01-01")
set_TaipeiMetro <- c("Taipei","New Taipei")
pick_fromTaipeiMetro <-
  example$residence %in% set_TaipeiMetro
誰喜歡美食且血型為B型
str(example[c("name","hobby","bloodType")])

example$name[
    pick_loveFood & pick_bloodB
  ]
誰1998以後(含)出生或不住大台北
example[c("name","birthday","residence")]

example$name[
  pick_after98 | !pick_fromTaipeiMetro
]
誰1998以後(含)出生且住大台北且血型B型
example$name[
  pick_after98 & pick_fromTaipeiMetro & pick_bloodB
]
以上邏輯向量間的運算結果還是邏輯向量——依然是「要/不要」向量,所以還是可以用來取出元素。但有時我們要做的運算是希望得到一個T/F元素值,而非一串元素值,如:
是不是所有的人都來自大台北?
有任何人喜歡美食嗎?
這種運算我們留到流程控制時再講。
4.7 On factor class
4.7.1 Parsing
原始資料都是文字訊息,電腦不可能一看就知道是類別資料,要透過factor(...)來parsing。
set.seed(2020)
ages_chr <- sample(c("4以下","5-10","11-15"), 15, replace=T)
ages_chr
查看符號字面資訊有幾種可能類別:
unique(ages_chr)每一類有多少筆資料:
table(ages_chr)讓電腦了解字面資訊為類別資料:
factor(
  字面資訊向量
)
ages_fct1 <-
factor(
ages_chr
)電腦懂得資訊為類別資料(存在物件ages_fct1)
但電腦不知道呈現類別資料時,那一類要先,那一類放最後。
table(ages_fct1)
table(ages_chr)- 內定levels呈現順序是根據電腦內字元排序(collating sequence)依辭典序列方式決定排序,很多時候沒有意義。

讓電腦懂類別資料也教它呈現序順:
factor(
  字面資訊向量,
  levels = 類別資訊呈現時的先後順序向量
)
ages_fct2 <-
factor(
ages_chr,
levels = c("4以下","5-10","11-15")
)電腦懂得資訊為類別資料(存在物件ages_fct1)
電腦知道呈現類別資料時的類別先後順序。
但電腦不知道不同類資料可不可以比大小,內訂是假設不能比大小
table(ages_fct1)
table(ages_fct2)ages_fct2[[3]] #4以下
ages_fct2[[6]] #5-10
ages_fct2[[3]] > ages_fct2[[6]]
讓電腦懂類別資料也教它呈現序順就是小到大的順序:
factor(
  字面資訊向量,
  levels = 類別資訊呈現時的先後順序向量,
  ordered = TRUE # 告訴電腦類別呈現的先後順序,即可比大小的小(先)大(後)順序
)
ages_fct3 <-
factor(
ages_chr,
levels = c("4以下","5-10","11-15"),
ordered = T
)ages_fct3[[3]] #4以下
ages_fct3[[6]] #5-10
ages_fct3[[3]] > ages_fct3[[6]]
ages_fct3[[6]] < "11-15" # 也可以用文字寫下levels中有的分類
若一開始的parsing設定不對,可以事後再透過factor parsing一次,但第二次只要放上要改正的設定即可。
# 忘了告訴電腦是ordered factor
ages_fct2_order = factor(ages_fct2, ordered=T)
ages_fct2_order
# 也可以
ages_fct2_order = as.ordered(ages_fct2)

# 忘了告訴電腦呈現順序是"11-15","5-10","4以下"
ages_fct3_newLevels =
  factor(
    ages_fct3,
    levels = c("11-15","5-10","4以下")
  )
ages_fct3_newLevels
is.ordered(ages_fct3_newLevels)
4.7.2 Modify levels
當電腦已懂類別資料,要:
- 對原先類別給予不同稱呼
並不需要再用到parsing函數factor, 只需要透過:
levels(.) <- 來告訴電腦新的稱呼是什麼。
4.7.2.1 改變稱呼
在R裡,若你看到函數f說明在Usage同時寫上f() <-的用法時,它表示此函數f通常用來顯示物件的某種屬性,而f()<-則反過來是設定物件屬性:
levels: 用來顯示類別順序的「名稱」。
levels <- : 用來改變類別順序的「名稱」。
其他常用到設定用法的還有names(),attr()等等
old_fct <-
  factor(c("4以下","5-10","11-15"))
levels(old_fct) # 依序下的各類別名稱levels(old_fct) <- c("青少年", "幼兒", "兒童")
levels(old_fct)
old_fctlevels() <-是用來改變稱呼,千萬不能用它來改各類別排序。
old_fct2 <-
  factor(c("4以下","5-10","11-15", "5-10"))
levels(old_fct2)
levels(old_fct2) <- c("4以下","5-10","11-15")
old_fct2
要改變各類別排序得進行factor parsing的動作電腦才真的懂。
4.7.2.2 整併
改變類別稱呼還有一個應用就是進行「類別整併」
set.seed(2020)
ages_chr <- sample(c("4以下","5-9","10-14", "15-19"), 20, replace=T)
ages_chr
ages_fctBy5 <-
factor(
ages_chr,
levels = c("4以下","5-9","10-14", "15-19")
)
levels(ages_fctBy5)
table(ages_fctBy5)levels(ages_fctBy5) <- c("10以下", "10以下", "10以上", "10以上")
table(ages_fctBy5)4.7.3 增加資料
以元素新增手法增加。
新的值無需進行factor parsing, 直接以字串值來增加即可。
4.7.3.1 新資料level已存在
set.seed(2020)
ages_chr <- sample(c("4以下","5-9","10-14", "15-19"), 10, replace=T)
ages_chr
data_fct <- factor(ages_chr)
length(data_fct)data_fct[[11]] <- c("10-14")
data_fct
data_fct[c(12, 13)] <- c("5-9","15-19")
data_fct4.7.3.2 新資料level不存在
- 要先讓電腦知道有新類別的存在才能新增資料
levels(data_fct)
data_fct[[14]] <- "20-24"
data_fct[[14]]levels(data_fct)[[5]] <- "20-24"
levels(data_fct)
data_fct[[14]] <- "20-24"
data_fct若要新增的類別想放levels現有排序內,可
先新增類別在後,
加完資料後, 再進行factor parsing動作來修正類別排序。
ages_chr <- sample(c("5-9","10-14", "15-19"), 8, replace=T)
data_fct <- factor(ages_chr,
                   levels = c("5-9","10-14", "15-19"),
                   ordered = T)
# 新增類別
levels(data_fct)[c(4, 5)] <- c("20-24", "4以下")
# 新增資料
data_fct[c(9, 10, 11, 12)] <- c("20-24", "10-14", "15-19", "4以下")
# factor parsing修正排序
data_fct <- factor(
  data_fct,
  levels = c("4以下", "5-9","10-14", "15-19", "20-24")
)
data_fct增加類別資料千萬不能用直接用c( )進行recursive concatenate:
# 非類別資料
numVect <- c(2, 5, 7)
# 新增c(6, 10)
numVect <- c(numVect, c(6,10))
numVect
# 類別資料
fctVector <- factor(c("a","b", "c", "a"))
# 新增 'a', 'c'
fctVector
fctVector <- c(fctVector, c('a','c'))
fctVectorfactor vector只要遇到c()它會還原成儲存的type值。
使用list
兩個相同class vector的堆疊:
c( )堆疊
只會攜帶元素的儲存值及一小部份的原素屬性(attributes)如names(元素名稱)。
不會保留各元素的向量層次區隔,會維持atomic vector型態。
a <- c(Mary=178, Jack=165)
attr(a, "family") <- "Johnson"
attributes(a)

b <- c(Ben=170, David=172)
attr(b, "family") <- "Jenson"
attributes(b)

a_b <- c(a, b)
attributes(a_b)
list( )堆疊
會攜帶元素的所有屬性(attributes)。
且保留各元素的向量層次,形成各自區隔的元素值。
list_ab <- list(a, b)
list_ab
attributes(list_ab)
attributes(a)
attributes(b)
若list裡元素為相同class, 可使用unlist( )打破各自元素區隔而整併成一個atomic vector:
unlist_ab <- unlist(list_ab)
unlist_ab
attributes(unlist_ab)
fct_a <- factor(c('a','d','e'))
fct_b <- factor(c("a","e","j"))
fct_ab <-
list(fct_a, fct_b)
unlist(fct_ab)
c( )與list( )堆疊factors的差異
4.8 On character class
這節使用stringr套件,同時也有一小部份用到glue套件,請先下載安裝。
library(stringr)
library(glue)library(stringr)
library(glue)針對字串向量裡「每一個」元素值,進行「規律」偵測與偵測「結果回報」:
thatsAlright <-
  jsonlite::fromJSON(
    "https://www.dropbox.com/s/f3ox7rd5favr0o0/thatsAlright.json?dl=1"
)View(thatsAlright)4.8.1 字元數與字串向量長度
# 字串向量長度
length(c("I will"))
# 每個元素值有幾個字元(包含符號與空格)
str_length(c("I will"))
# 字串向量長度
length(thatsAlright)
# 每個元素值有幾個字元
str_length(thatsAlright)4.8.2 切割split
line67 <- thatsAlright[c(6,7)]
line67
[1] “I play my own damn tune, I shine like the moon” [2] “And very soon, I’ll soon fly over you”
str_split(line67, ",")4.8.3 規律探測
規律:有出現“you”字眼
pattern="you" [.]中來進行thatsAlright[.]元素選取。
str_detect
get c(T,F, F, T,...) logical returned value.
一一回報每個元素值是否符合規律。(產生要不要向量)
# 'you'是否出現在第1,2,3,...最後一句
pick_you <- str_detect(thatsAlright, pattern="you")
str_view_all(thatsAlright[pick_you],"you")
str_which
get c(1,15, 17, 18,...) integer returned value.
回報所有符合規律的元素位置。
# 哪幾句有'you'出現
whichHas_you <- str_which(thatsAlright, pattern="you")
whichHas_you
str_view_all(thatsAlright[whichHas_you],"you")
whichHas_you_fromPick <- which(pick_you)
whichHas_you_fromPickstr_subset
# 只留下有出現'you'字眼的句子
onlyYou <- str_subset(thatsAlright, pattern="you")

length(thatsAlright)
length(onlyYou)
str_count
回報每個元素規律出現次數。
# 每一句有幾個"you"
countEach_you <- str_count(thatsAlright,
                           pattern="you")
countEach_you
str_view_all(
  thatsAlright[1:10], pattern="you")
滿足“you”規律的有以下數個:
- you
- your
- young
等等,若只要you這個字可前後加\\b定義字的boundary。
patternWithBoundary="\\byou\\b"str_view_all(
c("I am yours",
"And you?",
"Young and smart",
"It means that you and I are lucky"),
pattern=patternWithBoundary
)4.8.4 正規表示式:目標規律描述
Regular expression(regex)一種廣義描述所要字串規律及在字句位置的表示法。
Rmdfiles <- c("file1.Rmd", "file2.R", "file3.rmd", "file4.RMD", "myRmd.R")
SchoolIds <- c("410973029", "410988011", "410974023","410783025","710773022","410788021","410673124","410873051","49988001")- task1: 找出Rmdfiles中副檔名為Rmd(不分大小寫)的檔案。
- task2: 找出學號中4開頭,108或109學年入學且系號為73或88的學號。
Regex寫法分成兩部份:
目標規律性描述(target pattern, 一定要有)
- task1目標是不分大小寫的Rmd
- task2目標是9位數字,第一位是4,接著是108或109,再來只能是73或88
- task1目標是不分大小寫的Rmd
目標位置註解(target position annotation,不一定需要)
- task1目標在完整檔案名稱的結尾,且前面跟著
.
- task1目標在完整檔案名稱的結尾,且前面跟著
target pattern
目標一 不分大小寫的rmd

[ ]來定義字元卷帶
Rmdfiles
regexPattern="[Rr][Mm][Dd]"
str_subset(
  Rmdfiles, pattern=regexPattern)
目標二 第一位是4,接著是108或109,再來只能是73或88

(phrase1 | phrase2)來定義字組(phrase)卷帶
SchoolIds
regexPattern="[4](108|109)(73|88)"
str_subset(
SchoolIds, pattern=regexPattern)如果卷帶裡只有一個值,可以不寫[], ()。
str_subset(
  SchoolIds,
  pattern="[4](108|109)(73|88)")
str_subset(
  SchoolIds,
  pattern="4(108|109)(73|88)")
4.8.5 規律粹取/取代
str_extract
sameIdentities <- c("臺北市", "台北市", "台北大學", "臺北大學", "基隆市")

str_detect(
  sameIdentities, pattern="[台臺]")
str_view_all(
sameIdentities, pattern="[台臺]")str_extract(
sameIdentities, pattern="[台臺]北市")dragonPeople <-
c(
"住在台北市的臺北人也常被稱為天龍人")
str_extract(
dragonPeople,
pattern="[台臺]北[市人]"
)
# 當一個元素值內的文字規律可多次出現時用_all來一網打盡,否則只處理第一個出現的規律
str_extract_all(
dragonPeople,
pattern="[台臺]北[市人]"
)str_replace
str_replace(string, pattern, replacement)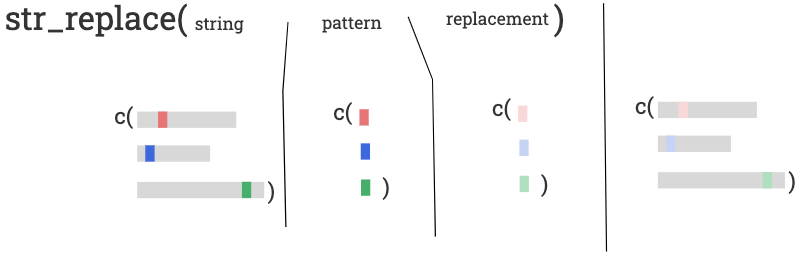
Rmdfiles # length=5
str_replace(
  Rmdfiles,
  pattern = rep("[Rr][Mm][Dd]",5),
  replacement = rep("Rmd",5)
)- pattern與replacement長度與string不同時會進行recycle。
Rmdfiles # length=5
str_replace(
  Rmdfiles,
  pattern = "[Rr][Mm][Dd]",
  replacement = "Rmd"
)
str_replace_all
不同規律要做不同替換時使用
str_replace_all(
  string,
  c(
    "pattern1"="replacement1",
    "pattern2"="replacement2",
    :
  )
)
emailContent <- '親愛的_name_朋友好,
恭喜你,你的電子發票號碼_invoiceNumber_ 差點中獎。'
cat(emailContent)replacementNamedVector <- c(
"_name_" = "小新",
"_invoiceNumber_" = "EF-89400133"
)
synthesizedContent <- str_replace_all(
emailContent,
replacementNamedVector
)
cat(synthesizedContent)了解如何regex形式的描述你的target後,接下來我們進一步學習如何更準確描述target在整個字串的位置。
4.8.6 複製次數Quantifiers:
目標 國立臺北大學100學年後入學學號
set.seed(2020)
d1 <- sample(c(rep("4",10),rep("3",3),rep("7",3)), 25, replace=T)
d2 <- sample(98:109, 25, replace=T)
d3 <- sample(c("73", "74", "78", "83", "72"))
d4 <- sample(1:120, 25, replace=T)
d4 <- str_pad(d4, 3, side = "left", pad="0")
schoolIds <- paste0(d1,d2,d3,d4)
schoolIds
目標規律描述: 9位數字
# {x} 前方卷帶連裝x條
str_subset(schoolIds,
           pattern='[0123456789]{9}')
str_subset(schoolIds,
           pattern='[0-9]{9}')
str_subset(schoolIds,
           pattern='[:digit:]{9}')
目標 找出所有對R的愛,愛的形式是以「太…愛」存在:
myLove2R <- c("我實在是太愛太愛太愛愛R課程了",
  "我才是太愛太愛太太愛太太太愛R了",
  "我則是太愛愛太愛太愛愛愛R了",
  "找我太太聊天,我太太愛理不理的,我只好回去練我最愛的R。")
{m}
目標1:找出連寫兩次的「太愛」
str_view_all(myLove2R, "(太愛){2}"){m,n} 及?
目標2: 找出「太愛」及「太愛愛」
# {1,2} 前面卷帶裝1~2條
str_view_all(myLove2R, "太[愛]{1,2}")
str_view_all(myLove2R, "太愛{1,2}") # 卷帶只有一個字,可不寫[]

# ? 前面卷帶不確定要不要裝(要裝也只會裝1條)
str_view_all(myLove2R, "太愛[愛]?"){m,n}是指裝m到n條:
{2,5}指裝2到5條,不是2條或5條
+
目標3:找出太後面有愛,但幾個愛不限
str_view_all(myLove2R, "太[愛]{1,}")?不確定愛不愛+沒有限制的愛(指1條或以上,也可寫{1,})*不管愛不愛,不管愛多深
str_view_all(myLove2R, "太[愛]*")4.8.7 正規表示式:目標位置註解
4.8.7.1 前後鄰居描述

str_view_all(myLove2R, "太愛[愛]?")- 每段愛應該是「太」開頭,「愛」結尾。
str_view_all(myLove2R, "太+愛+")str_view_all(myLove2R, "太+愛+(?!理不理)")找出縣市後的下一級行政區(即xxx區,xxx鎮)
addresses <- c(
  '臺中市后里區公館里尾社路385號',
  '新竹市東區科學園路125號1樓',
  '新竹市北區竹光路99號',
  '金門縣金城鎮賢庵里山前33號',
'臺中市南屯區工業區二十四路23號1樓')str_extract(
addresses,
"(?<=[縣市])[\u4E00-\u9FFF]+[區鎮]"
)- 字元排除卷帶
[^XYZ]:要排除的字元XYZ
str_extract(
  addresses,
  "(?<=[縣市])[^區]+[區鎮]"
)
4.8.7.2 頭尾定位
針對目標在開頭或結尾
在開頭:
^目標(不要和字元排除卷帶[^XYZ]搞混)在結尾:
目標$
Rmdfiles <- c("file1.Rmd", "file2.R", "file3.rmd", "file4.RMD", "myRmd.R")str_subset(
Rmdfiles, "[Rr][Mm][Dd]"
)
# 要求在句尾
str_subset(
Rmdfiles, "[Rr][Mm][Dd]$"
)Homework2 總共有幾小題?
download.file("https://www.dropbox.com/s/o9kt3lxtx9pmjqj/homework2.Rmd?dl=1", destfile = "./hw2.Rmd", mode="wb")
xfun::read_utf8("./hw2.Rmd") -> hw2lines
View(hw2lines)
pick_starting3Hash <- str_detect(
hw2lines,
"^###"
)
sum(pick_starting3Hash)pick_starting3Hash <- str_detect(
hw2lines,
"^### (?=[0-9])"
)
sum(pick_starting3Hash)4.8.8 字元卷帶模版
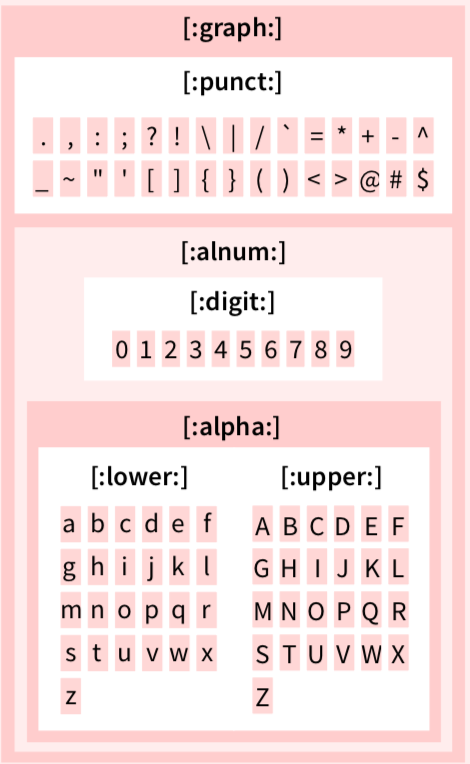
[:graph:]包山包海,還包中文字元。[\u4E00-\u9FFF]代表所有中日韓文字字元。
4.9 On list
library(purrr)4.9.1 {…}的使用
範例:Sukiya的三大類餐,想抽出其下品項名稱各有哪些
sukiyaMenu <- jsonlite::fromJSON("https://www.dropbox.com/s/iu9b1hnvbtss83q/sukiyaMenu.json?dl=1")

nonsetMenu3 <- sukiyaMenu[c("豪華雙饗丼", "牛丼類", "咖哩類" )]
items <- list()
items$dish_name = vector("list", length=3)vector(mode, length) 可以產生一個mode(可以想成class)且長度為length的向量(廣義定義,包含list)
- The atomic modes are “logical”, “integer”, “numeric” (synonym “double”), “complex”, “character” and “raw”.
charVect <- vector("character", 5)
charVect
charVect <- vector()
# 餐點名稱
dish_name = nonsetMenu3[[1]]$name
items$dish_name[[1]] <- unlist(dish_name)
dish_name = nonsetMenu3[[2]]$name
items$dish_name[[2]] <- unlist(dish_name)
dish_name = nonsetMenu3[[3]]$name
items$dish_name[[3]] <- unlist(dish_name)# 餐點名稱
{
dish_name <- nonsetMenu3[[1]]$name
items$dish_name[[1]] <- unlist(dish_name)
}
{
dish_name <- nonsetMenu3[[2]]$name
items$dish_name[[2]] <- unlist(dish_name)
}
{
dish_name <- nonsetMenu3[[3]]$name
items$dish_name[[3]] <- unlist(dish_name)
}{...} 裡面「最後一個expression」的「可視(visible)值」可以當做值用來賦予一個物件元素值。也就是說
result <- {...} # 或
{...} -> resultresult的值會是{...}裡最後一個expression的可視結果
{
  dish_name <- nonsetMenu3[[1]]$name # 1st expression
  items$dish_name[[1]] <- unlist(dish_name)  # 2nd expression
}
最後一個expression的可視結果
items$dish_name[[1]]  # 或
unlist(dish_name)
4.9.1.1 <-{…}與{…}->
也就是說
result1 <- {
  dish_name <- nonsetMenu3[[1]]$name # 1st expression
  items$dish_name[[1]] <- unlist(dish_name)  # 2nd expression
}
{
  dish_name <- nonsetMenu3[[1]]$name # 1st expression
  items$dish_name[[1]] <- unlist(dish_name)  # 2nd expression
} -> result2- result1, result2的值都是unlist(dish_name)的可視值
result3 <- {
  dish_name <- nonsetMenu3[[1]]$name # 1st expression
  unlist(dish_name)  # 2nd expression
}cat(...)只會有螢幕資訊,但值不會留下來形成可視值。print(...)則會留下可視值。
result4 <- {
  dish_name <- nonsetMenu3[[1]]$name # 1st expression
  cat(unlist(dish_name))  # 2nd expression
}
4.9.1.2 Block programming
{...}有助於拆解問題解決步驟。
小明點了“牛肉燒烤雞肉雙饗丼”飯大碗,小英點了“秋葵牛丼”迷你碗, 兩人總共花了多少錢
mingsPrice <- # 找出小明價格
{

}

yingsPrice <- # 找出小英價格
{

}

total= mingsPrice + yingsPrice
mingsPrice <- # 找出小明價格
{
sizeChoice <- nonsetMenu3[["豪華雙饗丼"]][["product_variations"]][[2]]
pick_size <- sizeChoice$name == '飯大碗'
sizeChoice$price[pick_size]
}
yingsPrice <- # 找出小英價格
{
sizeChoice <- nonsetMenu3[["牛丼類"]][["product_variations"]][[4]]
pick_size <- sizeChoice$name == '迷你碗'
sizeChoice$price[pick_size]
}
total= mingsPrice + yingsPrice4.9.2 formula and purrr::map

library(purrr)
map(
  list(2,5,3,7),
  ~{
    3^.x
  }
)
map(
  c(2,5,3,7),
  ~{
    3^.x
  }
)map(
list(
list("Mary", 5),
list("John", 10)
),
~{
paste0(.x[[1]], " is ",.x[[2]], " years old")
}
)兩種.x的使用
myData <-
  list(
    list("Mary", 5),
    list("John", 10)
  )

# .x 代表myData的元素
map(
  myData,
  ~{
    paste0(.x[[1]], " is ",.x[[2]], " years old")
  }
)

# .x 代表myData元素值的位置
map(
  1:2,
  ~{
    paste0(myData[[.x]][[1]], " is ", myData[[.x]][[2]], " years old")
  }
)
使用元素值位置時,position sequence可以透過:
seq_along(object)去產生object底下所需對應元素值位置的position sequence。
map(
  seq_along(myData),
  ~{
    paste0(myData[[.x]][[1]], " is ", myData[[.x]][[2]], " years old")
  }
)
目標 列出Sukiya菜單上所有餐色名稱
之前我們針對每一個,以第1個為例,進行如下的運算
{
  dish_name <- nonsetMenu3[[1]]$name # 1st expression
  unlist(dish_name)  # 2nd expression
}
也就是說,若換成完整sukiyaMenu:
{
  dish_name <- sukiyaMenu[[.x]]$name # 1st expression
  unlist(dish_name)  # 2nd expression
}
使用map
map(
  seq_along(sukiyaMenu),
  ~ {
    dish_name <- sukiyaMenu[[.x]]$name # 1st expression
    unlist(dish_name) # 2nd expression
  }
) -> result
result <- unlist(result[-1])
resultmap(
sukiyaMenu,
~ {
dish_name <- .x$name # 1st expression
unlist(dish_name) # 2nd expression
}
) -> result
result <- unlist(result[-1])
result4.10 綜合練習
1 Foodpanda Sukiya
Visit Sukiya restaurant’s menu in Foodpanda:
https://www.foodpanda.com.tw/restaurant/f5ze/sukijia-sukiya-xin-bei-san-xia-dian
You will see something like:

First, take Gyudon with Tomato Sauce (番茄牛丼飯) as the example to answer the following questions. Its data details are marked in light blue color ◼. This data observation consists of 4 features (marked in red color ◼). Each feature has its content value marked in green color ◼. When recording observations, we consider the feature value of:
category: to be a factor, with levels marked in “category的levels可能值”. For simplicity, we only take levels from 新登場 to 豬肉丼類.
item: to be a character.
descriptions: to be a character.
price: to be a numeric (double class).
Consider recording Sukiya’s detail information as the following structure
List of 4
.$ category   : item1_category_value
.$ item       : item1_name_value
.$ description: item1_description_value
.$ price      : item1_price_value
1.1
Construct Gyudon with Tomato Sauce data as a list of 4 following the structure required above (be aware of element name and class requirements), and save it as newPromotion1.
# newPromotion1 1.2
Following the same idea to construct the data object for 溫蔥玉牛丼套餐 and save it as recommend1.
# recommend11.3
A menu of a restaurant can be considered as a collection of many item data details. This collection can be a list of many, where many depends on how many items the restaurant offer. Construct the menu data for Sukiya as a list of 2, where element 1’s value comes from newPromotion1 and element 2’s value from recommend1. Save the menu as an object named sukiyaMenu. The element in sukiyaMenu has no element name.
# sukiyaMenu1.4
The current price is for promotion. After promotion, the restaurant decides to move it from 新登場 to 牛丼類, and changes its price to 120. Please revise sukiyaMenu accordingly and save it as sukiyaMenu2.
# sukiyaMenu21.5
Foodpand decides to restructure menu data. It requires the new menu data must follow the following structure.
List of 4
 $ category   : c(item1_category_value, item2_category_value, ...)
 $ item       : c(item1_name_value, item2_name_value, ...)
 $ description: c(item1_description_value, item2_description_value, ...)
 $ price      : c(item1_price_value, item2_price_value, ...)
Use only the sukiyaMenu to form the new menu data object. And save it in an object called sukiyaMenu3.
# sukiyaMenu31.6 Foodpanda realized the currect data structure put heavy load on their platform service, which results in several service shutdown lately. Their data team decides the optimal data structure should have each restaurant’s menu looks like
List of 2
 $ :List of 2
  ..$ category: chr "新登場"
  ..$ options :List of 3
  .. ..$ item       : chr, 所有同類商品的item形成的vector
  .. ..$ description: chr, 所有同類商品的description形成的vector
  .. ..$ price      : num, 所有同類商品的price形成的vector
 $ :List of 2
  ..$ category: chr "推薦套餐"
  ..$ options :List of 3
  .. ..$ item       : chr, 所有同類商品的item形成的vector
  .. ..$ description: chr, 所有同類商品的description形成的vector
  .. ..$ price      : num, 所有同類商品的price形成的vector
Use only the sukiyaMenu to form the new menu data object. And save it in an object called sukiyaMenu4.
# sukiyaMenu42 Presidential Election
Import the following data of Taiwan 2020 presidential election:
election2020 <- jsonlite::fromJSON(
  "https://www.dropbox.com/s/a3torx0p41hheb6/presidentElection2020.json?dl=1"
)
There are five columns in the data. Columns with labels (1), (2), (3) mark the supporting rate of each one of the three candidates.
2.1
Regarding DPP(民進黨), construct an object called best_performance_dpp to record the party’s best performance among all New Taipei city counties. The selection criterion is the highest supporting rate (最高得票率). The object has the following structure:
List of 3
 $ county           : chr
 $ votes          : int
 $ supporting_rate: num
where
county: 鄉(鎮、市、區)別名稱
votes: 總得票數(用有效票數x得票率,四捨五入到整數),可使用round函數,如
round(2.33)會得到2。supporting_rate: 得票率
2.2
Extract DPP candidate’s supporting rate saved it in dppSupportRate. It should be a numeric. Then name each element based on its corresponding county (使用數值來源的行政區來命名元素值). Sort dppSupportRate using sort(dppSupportRate), saved it in dppSupportRate_sorted. Finally use names(dppSupportRate_sorted) to obtain the county name sequence whose order represent the lowest to the highest DPP-supporting counties, save the sequence in the answer object levelSequence.
(Use named vector to obtain desired level sequence is a very common technique.)
2.3
change election2020[["鄉(鎮、市、區)別"]] to be an unordered factor, whose levels sequence is based on DPP’s supporting rate in the county; the highest one goes first, the lowest one goes last, and so on. (hint: function rev() might be helpful)
3 The center god of the universe
In the song That’s Alright, by Laura Mvula, the lyrics contain three consecutive repeating sentences of “Who made you the center of the universe.” However, if you listen to the song carefully, the correct lyrics should be “Who made you the center GOD of the universe.” In following questions, you will be asked to fix the sentence in different ways.
3.1
thatsAlright <-
  jsonlite::fromJSON(
    "https://www.dropbox.com/s/f3ox7rd5favr0o0/thatsAlright.json?dl=1"
  )
3.2
4 Image
library(magick)
# windows user needs this step
download.file("https://www.dropbox.com/s/7ab61bq92s9yt4e/ntpu.png?dl=1",destfile = "./ntpu.png",mode = "wb")
# read original image file
ntpuLogo <- image_read("./ntpu.png")
# convert image into a matrix of color codes (raster matrix)
ntpuLogoRaster <- as.raster(ntpuLogo)

# plot raster image
plot(ntpuLogoRaster)
The resolution of an image is measured by its pixels(像素). Each pixel carries one color code, such as “transparent”, “blue”, “red”, or “#xxxxxxxx” where x is can be one of 0, 1, …,9, A, B, …,F. A rectangular image can be cut into H x W amounts of pixel–where H is the number of vertical pixels (height), and W is the number of horizontal pixels (width). dim(ntpuLogoRaster) shows that the image is composed by 183 x 300 pixels.
dim(ntpuLogoRaster) # show 183 rows x 300 columns pixelsntpuLogoRaster is a matrix representation of a character vector. It is rectangular; therefore, you can use [.row, .col] to extract any pixel color. A little difference from matrix is that ntpuLogoRaster has raster class, which makes plot() work. (plot() won’t work on a matrix class object.)
ntpuLogoRaster[1, 1] # get you "transparent" as a color

ntpuLogoMatrix <- as.matrix(ntpuLogoRaster)
ntpuLogoMatrix[1, 1] # get you "transparent" as character
plot(ntpuLogoRaster)
plot(ntpuLogoMatrix) # won't work
plot(as.raster(ntpuLogoMatrix)) # work again
4.1 Red frame
Put a red frame around the image border. That is assign “red” to the border pixels and save the image with border in ntpuLogoRaster_redFrame. plot(ntpuLogoRaster_redFrame) will look like:

4.2 Create grey rectangular
Change color codes of pixels between rows 105 to 145, and columns 55 to 95 to “grey”, and save the raster matrix to object ntpuLogoRaster_greySelect. plot(ntpuLogoRaster_greySelect) will look like:

Matrix
是Atomic vector的特例,將原本只有長度length(一個維度)概念的資料,賦予vector裡面每個元素多維度位置指標(透過dim<-或matrix函數)
A2H <- LETTERS[1:8] # 大寫字母A to H
# 要拿A, G
A2H[c(1,7)]

# 一旦變成matrix
matrixA2H <- matrix(A2H, 2, 4)
# 要拿A, G可以
matrixA2H[c(1,7)]
matrixA2H
# 也可以
matrixA2H[1,c(1,4)]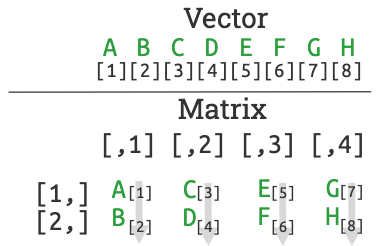
[ ]的取法([]<-替換)又多了[ , ]取法([ , ] <-替換)
4.3 Blue falcon
All the str_... operation can be applied to a matrix class object (but not so well to a raster class object):
The following example shows that str_which gives the right positions for matrix but wrong positions for raster:
charMat <- matrix(LETTERS[1:6], 2,3)
charRaster1 <- charRaster2 <- as.raster(charMat)

# Find out the location of A E and replaced them with wooo
str_which(charMat, "[AE]") -> mat_whichHasAE
charMat[mat_whichHasAE] <- "wooo"
cat('replace A/E with wooo: correct outcome from matrix')
charMat

str_which(charRaster1, "[AE]") -> raster_whichHasAE
charRaster1[raster_whichHasAE] <- "wooo"
cat('replace A/E with wooo: wrong outcome from raster')
charRaster1

cat('replace A/E with wooo: correct outcome from raster\n with index from its matrix equivalence\n')
charRaster2[mat_whichHasAE] <- "wooo"
charRaster2
A raster can be converted to a matrix, use as.matrix(). Locate the positions of those pixels that are not transparent and save them as a numeric vector whichIsNotTransparent. Put your code of obtaining whichIsNotTransparent inside the { }, so that running the chunk will get you a blue falcon.
ntpuLogoRaster_blue <- ntpuLogoRaster
{
  # put your code inside here
}
ntpuLogoRaster_blue[whichIsNotTransparent] <- "blue"
plot(ntpuLogoRaster_blue)
5. Fix Rmd
Rmd files have the structure of code chunks that
for each line of
```{r}, there is a line of```in a later line。for each pair of
```{r},```lines, there cannot be any```{r}line or```lines position within that pair of lines.

The following code will randomly generate 1 Rmd file, saved as “test.Rmd”
source("https://www.dropbox.com/s/i20ecjsi2af130q/generate_problemRmd.R?dl=1")
.generate_problemRmd()
file.edit("./test.Rmd")
To read the file into R as a character vector, you can
xfun::read_utf8("./test.Rmd") -> rmdlinesuse View(rmdlines), you can see the current content in the Rmd file line-by-line as a character vector.
Fill in your codes inside {…} so that when you run the following code chunk. correctRmdlines will be the rmdlines with any ```{r} line or ``` line position within that a pair of ```{r} and ``` lines removed.
correctRmdlines <-
{
  rmdlines <- xfun::read("./test.Rmd")

}
# correctRmdlines
6. Help spot
Run the following program to get the data object hotSpot
hotSpot <- jsonlite::fromJSON(
  "https://www.dropbox.com/s/77awvomxaseg8b3/helpSpot.json?dl=1", simplifyDataFrame = F
)
6.1 Delete Record
Take hotSpot$result$records out. Save it as records. Remove the first element in records.
6.2 list to data frame
Convert records to data frame and saved it in the object df_records
6.3 factor parsing
In df_records, change both elements DeptNm(管轄警察局) and BranchNm(分局) into factor
6.4 regex
The regex that represent any ONE Chinese, Japanese, Korean characters is (中日韓字元卷帶) [\u4E00-\u9FFF]. Extract the country that each DeptNm belong to (管轄警察局所在縣市) and save it in df_records$county (class factor)
6.5 levels modification
Create an element named zone in df_records, whose value is
“北部地區” if county is from 臺北市、新北市、基隆市、新竹市、桃園市、新竹縣及宜蘭縣。
“中部地區” if country is from 臺中市、苗栗縣、彰化縣、南投縣及雲林縣。
“南部地區” if county is from 高雄市、臺南市、嘉義市、嘉義縣、屏東縣及澎湖縣。
“東部地區”:if county is from 花蓮縣及臺東縣。
df_records$zone is a factor.
6.6 regex
Extract the secondary administrative zones, which normally ends with 區、鎮、鄉、市. Save it in df_records$township. If the address does not show the secondary administrative zone, leave NA value.
6.7
How many help spots in each township? (ignore NA)
6.8 block programming
How many townships is each contact person in charge of?
7. Hexadecimal
Most of our daily numeric computation is based on decimal system(十進位系統). The way we count is 0, 1, 2, 3, …, 9; then 10. The last count resets the unit digit(個位數) from 9 to 0, and create an ten digit(十位數) starting from 1. Further counting will add one to unit digit until it reaches 9; then push it to then ten digit adding one to that digit while resetting unit digit back to 0 again.
In computer science, hexidecimal(16進位) system is widely used. Each digit can go from 0 to 9, then A, B, C, D, E, F – totally 16 symbols that corresponds to 0 to 16 in decimal system. That is A in Hexidecimal system, denoted as \((A)_{16}\), is equivalent to 10 in our decimal system; and \((B)_{16}\) is equivalent to 11 in our decimal system; …, and \((F)_{16}=15\) in decimal system. When you count to F, adding one to it will create and push a new digit that starts from 1 and reset the unit digit to 0; it leads us to \((10)_{16}\) (this means \((10)_{16}\)=16 in decimal system)
7.1 Hexadecimal to decimal
To convert a hex number such as “2FB” to a decimal number, it involves the following two steps:
For each digit, convert it to its corresponding decimal numbers. \((2)_{16}=2\), \((F)_{16}=15\), \((B)_{16}=11\).
Depending on the length of hexadecimal numbers. For a length of 3 digits, the corresponding decimal numbers for each digit, as in our example
c(2, 15, 11), should be weighted byc(16^2, 16^1, 16^0)and sum together to give the final decimal equivalence. That is \(2*16^2+15*16^1+11*16^0=763\) in our example.
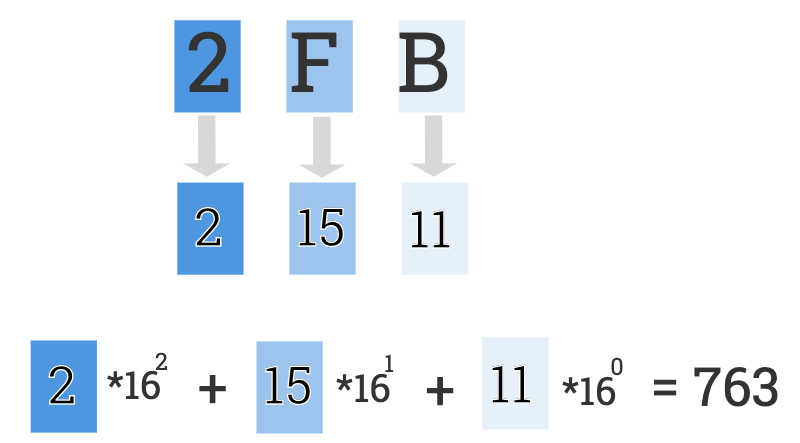
hexVector <- c("2","F","B")
v <- c(2, 15, 11)
7.2
The character vector hexVector is a split of hexidecimal number “2FB”. Parse hexVector into a factor, named hexVector_fct so that as.integer(hexVector_fct) will be c(3, 16, 12), the value of which has each element value corresponds to the hexidecimal symbol’s value in decimal system plus 1.
7.3
8. Dispute
Whenever a homework or a midterm is returned, an issue for dispute is created in our course github page.
For each dispute issue, the first message looks like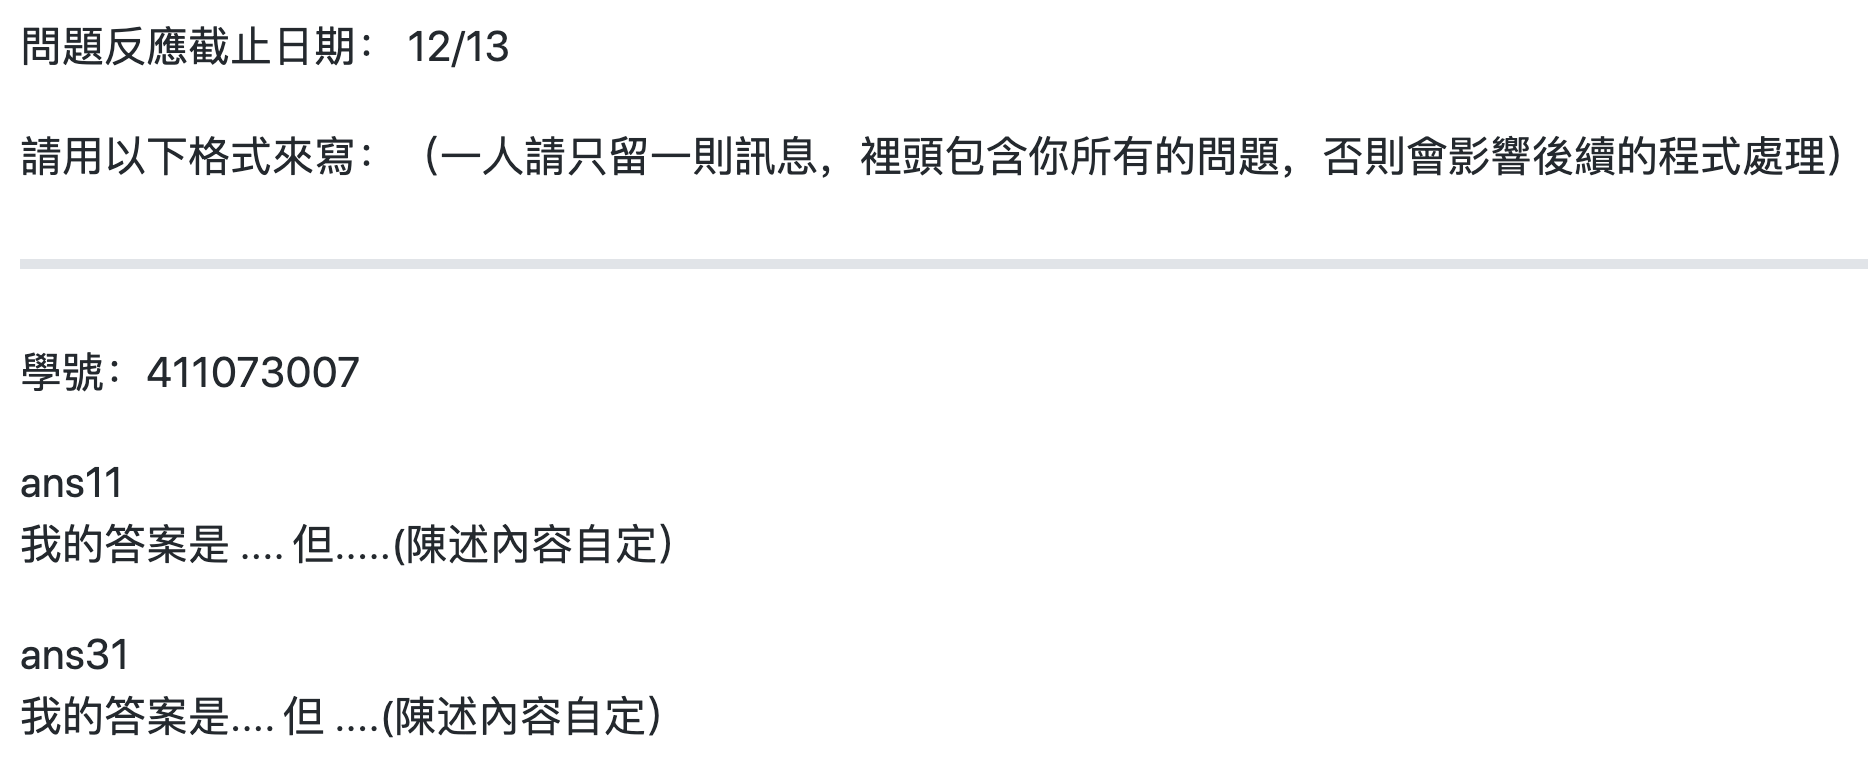
We have developed a program that can communicate with Github.com to obtain all the comments related to a given issue. The response from Github is like the following list:
githubResponse <-
list(
  list(
    content=c("學號: 410674084",
              "ans15",
              "答案和正確解答相同卻被扣分。")
  ),
  list(
    content=c("學號410978226",
              "ans22, ans23",
              "我答錯了卻沒被扣到分。")
  ),
  list(
    content=c("我的學號是410888888",
              "ans5s",
              "答案步驟應該是錯的,我的才是對的",
              "",
              "ans41",
              "題目造成我誤解。")
  ),
  list(
    content=c("我學號410687012: ans21, ans33有問題",
              "ans41給的數字429283910似乎有問題")
  )
)
8.1 Reshape one element
Use the idea of block programming, fill in your code inside {...} but after contentX <- .... The goal is to generate an answer object githubResponse_reshape_X (object class: list, length: 2, element names: “id” and “questionLabel”, element classes: id is character of 1, questionLabel is character of 1)
githubResponse_reshape_X <-
{
  contentX <- githubResponse[[1]]$content

}
# githubResponse_reshape_X
What correct answer shows when print:
print(githubResponse_reshape_X)$id [1] “410674084”
$questionLabel [1] “ans15”
8.2 Apply to all
Apply your algorithm to all element values in githubResponse to form the answer object githubResponse_reshape which is a list of 4 elements, each of which holds the information from the corresponding element of githubResponse. For the structure of githubResponse_reshape, class is list, length is 4; for each element, element class is list, length is 2, underneath element names are “id” and “questionLabel”, underneath element classes have id being character of 1, questionLabel being character whose length is determined by how many questions the comment mentioned)
# githubResponse_reshapeThe necessary condition for a right answer should have 6 TRUE after running the following codes
# **githubResponse_reshape**,
## class is list
is(githubResponse_reshape, "list")
## length is 4
length(githubResponse_reshape) == 4
## for each element,
### element class is list
all(purrr::map_lgl(githubResponse_reshape,is.list))
### length is 2
all(purrr::map_int(githubResponse_reshape,length) == 2)
### **underneath element**
#### element names are "id" and "questionLabel"
all(purrr::map_lgl(
githubResponse_reshape,
~{all(names(.x)==c("id","questionLabel"))}))
#### element classes have
###### id being character of 1,
###### questionLabel being character.
all(purrr::map_lgl(
githubResponse_reshape,
~{
is(.x[["id"]],"character") && length(.x[["id"]])==1 &&
is(.x[["questionLabel"]],"character")
}
))8.3 irregular pattern
It is possible that question labels “ans11, ans12, ans13, ans4” are described as “ans 1.1-3, ans4”, or “ans11-13, 4” deviated from the required pattern like the following example:
irregularLabels <-
c(
"ans11, ans12, ans13, ans4b, ans51b",
"ans 1.1-3, ans4b, ans51b",
"ans11-13, 4b, 51b"
)For expression “ansX.Y-Z”, please complete the following programming block so that given a randomly generated label expression irregularLabel_x:
X <- sample(1:9,1)
Y <- sample(1:5,1)
Z <- sample(6:9,1)
irregularLabel_x <- paste0("ans",X, ".",Y,"-",Z)
irregularLabel_xthe answer object regularSequence form a two digit numeric sequence from “XY” to “XZ”. For example “ans5.3-7” should form a sequence c("53", "54", "55", "56", "57"). (regularSequence, class: character)
(Hint: functions might be useful. seq(6, 10) will generate c(6,7,8,9,10))
regularSequence <-
{
}
# regularSequence9. 十二星座
The following code will give you a mapping of a person’s birthday to his/her horoscope (星座), stored in the object horoscopes. At the same time, a random sample of 10000 birthdays are generated from 2010-01-02 to 2016-01-01.
library(lubridate)
jsonlite::fromJSON(
"https://www.dropbox.com/s/qmgurf88a2qdvzl/horoscopes.json?dl=1") -> horoscopes
birthday_list <-
list(
date=sample(
seq(ymd_hm("2010-01-02 00:00"),
ymd_hm("2016-01-01 00:00"), by="hour"),
10000
)
)Please construct a character vector (named horoscopesMapped) of length 10000 that store each birthday’s corresponding horoscopes, like “金牛座”, “雙魚座”, etc.
# horoscopesMapped在數值資料及時間資料,cut(numeric_vector, breaks) 可將numeric vector裡每個元素以它落在哪個切割區間(由break點定義)形成「類別」表示。
originX <- 0:10
originX
# 將0-10切兩份
cutX_evenly <- cut(originX, breaks=2)
cutX_evenly指定切點要將資料在3, 7點各劃一刀分成3份
# 由breaks將0(含)到10間(含)分成3份
cutX_error <- cut(originX, breaks=c(0,3,7,10))
cutX_errornumeric class內訂區間為
( ]型態:由於
( ]型態, 所以只有(break_min, break_max]內的資料才不會形成NA.break_min要比資料最小值小一些, break_max可以是max(originX)
# 由breaks將-1(不含)到10間(含)分成3份
cutX_correct <- cut(originX, breaks=c(-1,3,7,10))
cutX_correct比較直覺用法:
# 另一種用法
cutX_infinity <- cut(originX, breaks=c(-Inf,3,7,Inf))
cutX_infinity用在時間資料時,每個break point想成是新事件開始的日期,所以它的區間類型內訂[ ) (即right (close)= F)
由於[ ), 所以只有[break_min, break_max)內的資料才不會形成NA. break_max 要比資料最大值大一些, break_min可以是min(originD)。
library(lubridate)
originD <- ymd(c(
"2020-01-03",
"2020-02-11",
"2020-03-08",
"2020-05-07",
"2020-09-20",
"2020-10-10",
"2020-11-07",
"2020-12-05"))
originD事件發生區間:
- 事件一:“2020-03-08”-“2020-05-21”
- 事件二:“2020-07-20”-“2020-10-11”
資料開始-“2020-03-07”,
“2020-03-08”-“2020-05-21”, (事件一)
“2020-05-22”-“2020-07-19”,
“2020-07-20”-“2020-10-11”, (事件二)
“2020-10-11”-資料結束
[ )找下刀的時點。
資料開始, “2020-03-08”, “2020-05-22”, “2020-07-20”, “2020-10-11”, 資料結束再多一天
# 由breaks將2020-01-03(含)至2020-12-06(不含)分成三份
cutD <- cut(originD,
breaks =
c(
min(originD),
ymd(c(
"2020-03-08",
"2020-05-22",
"2020-07-20",
"2020-10-11")),
max(originD)+days(1)
))
cutD修改levels
levels(cutD) <- c("沒事","事件一","沒事","事件二","沒事")
df <- data.frame(
origin=originD,
cut=cutD
)
View(df)使用Inf
# 也可以使用Inf
cutD <- cut(originD,
breaks =
c(
min(originD),
ymd(c(
"2020-03-08",
"2020-05-22",
"2020-07-20",
"2020-10-11")),
Inf # 小心不要 ymd(Inf)
))
cutD時間不能使用-Inf
# 時間沒有負無窮。(正負無窮是在有一個絕對原點0的情況下才有的數學概念)
cutD <- cut(originD,
breaks =
c(
-Inf,
ymd(c(
"2020-03-08",
"2020-05-22",
"2020-07-20",
"2020-10-11")),
Inf
))